Can you truly harness the power of your Internet of Things (IoT) devices from afar, all while keeping your wallet firmly in your pocket, using only your Mac and the magic of SSH? Absolutely! The digital world is in constant motion, and the ways we interact with technology are rapidly evolving, especially with the rise of IoT. Learning to use SSH for remote access is not just a technical skill; it's becoming a necessity for both tech enthusiasts and seasoned professionals. This guide offers a comprehensive, step-by-step walkthrough, ensuring you're able to securely connect to and manage your IoT devices from your Mac, all without incurring any costs. Prepare to transform the way you interact with your connected devices.
SSH, or Secure Shell, is the cornerstone of secure remote access. It's a cryptographic network protocol designed to facilitate secure data communication across networks. Whether you're a newcomer or an experienced user, this article arms you with the essential knowledge needed to set up SSH remote access for your IoT devices on your Mac a practical and cost-effective solution. By the end, you'll be well-versed in the tools, configurations, and best practices that will allow you to harness SSH's capabilities. Join us as we delve into the realm of remote IoT management and discover how SSH can reshape your workflow.
Table of Contents
- Understanding SSH
- Why SSH is Ideal for IoT
- Getting Started: Prerequisites
- Setting Up an SSH Server
- Connecting to Your IoT Device
- Enhancing SSH Security
- Troubleshooting Common Issues
- Exploring Advanced Features
- Cost-Effective Solutions
- Final Thoughts
Understanding SSH
SSH, or Secure Shell, is a powerful cryptographic network protocol engineered for secure data communication. At its core, SSH establishes a secure channel over an unsecured network, offering a safe environment for users to manage and control remote devices. SSH is a widely adopted technology in various IT environments, playing a key role in IoT ecosystems because of its robust security features and versatility. It provides a reliable and secure pathway to manage devices that may be spread out across the globe.
- Rj Barrett Allegations What You Need To Know The Fallout
- Ashton Jeantys 40time Success A Journey Of Inspiration Perseverance
Key Features of SSH:
- End-to-end encryption to secure data transmission
- Advanced authentication methods to confirm user identity
- Support for a wide range of commands and file transfer capabilities
A solid understanding of SSH fundamentals is crucial if you plan to manage IoT devices remotely, especially when using a Mac. This initial exploration will establish the groundwork for the rest of the guide, ensuring you have a firm foundation.
Why SSH is Ideal for IoT
The interconnected nature of today's world means that IoT devices are often situated in remote locations, making physical access impractical. SSH provides a reliable solution for managing these devices from a distance. By using SSH, you gain several benefits:
- Understanding Ebony Bbc Culture Identity Significance
- Breaking Chains Meme Origins Meaning Impact A Deep Dive
- Establish secure connections to your IoT devices from any location
- Execute commands and scripts to automate tasks
- Easily transfer files between your Mac and your IoT devices
SSH not only boosts convenience but also ensures data protection during transmission, minimizing the risk of unauthorized access. This makes it the perfect choice for IoT applications, where security is paramount.
Advantages of SSH Over Other Protocols
SSH stands out from alternative remote access protocols thanks to its significant advantages:
- Industry-leading encryption to ensure secure communication
- Public key authentication to increase security
- Compatibility with a wide range of devices and operating systems
| Feature | Details |
|---|---|
| Encryption | SSH employs robust encryption algorithms to secure all data transmitted between the client (Mac) and the IoT device. This includes encrypting the connection, commands, and file transfers. |
| Authentication | SSH offers various authentication methods, including password-based and public key authentication. Public key authentication is particularly secure, requiring a key pair instead of a password. |
| Command Execution | You can execute commands and scripts directly on your IoT device through the SSH connection. This allows for remote control and management of the device's functions. |
| File Transfer | SSH allows for secure file transfers between your Mac and the IoT device using protocols like SCP (Secure Copy) or SFTP (SSH File Transfer Protocol). |
| Port Forwarding | SSH supports port forwarding, enabling you to access services running on your IoT device (like a web server) through your Mac's connection. |
| Versatility | SSH is widely compatible with various operating systems and devices, making it a versatile solution for managing diverse IoT ecosystems. |
| Security Advantages | Compared to other protocols, SSH provides industry-leading encryption, public key authentication, and the ability to change the listening port to increase security. |
To delve deeper into the intricacies of SSH and explore further applications, you can explore: SSH.com Academy
Getting Started
Before you embark on the journey of setting up SSH for your IoT devices, you must ensure you have the following essential items in place:
- A Mac computer running the latest version of macOS
- An IoT device capable of running an SSH server
- A stable and reliable internet connection
- A basic understanding of terminal commands
TIP: If you're not familiar with terminal commands, don't worry! We will guide you through each step to guarantee a smooth and trouble-free experience.
Setting Up an SSH Server
To use SSH, you need to configure an SSH server on your IoT device. Most modern IoT devices come with SSH server capabilities, but you might need to activate it manually.
Steps to Enable SSH on Your IoT Device
1. Access the IoT Device: Connect to your IoT device using its default interface, such as a web UI or CLI.
2. Locate the SSH Settings: Go to the settings menu and find the section related to SSH.
3. Enable SSH: Activate the SSH server and take note of the device's IP address.
With the SSH server enabled, your IoT device will be ready to receive remote connections, bringing you one step closer to managing it from afar.
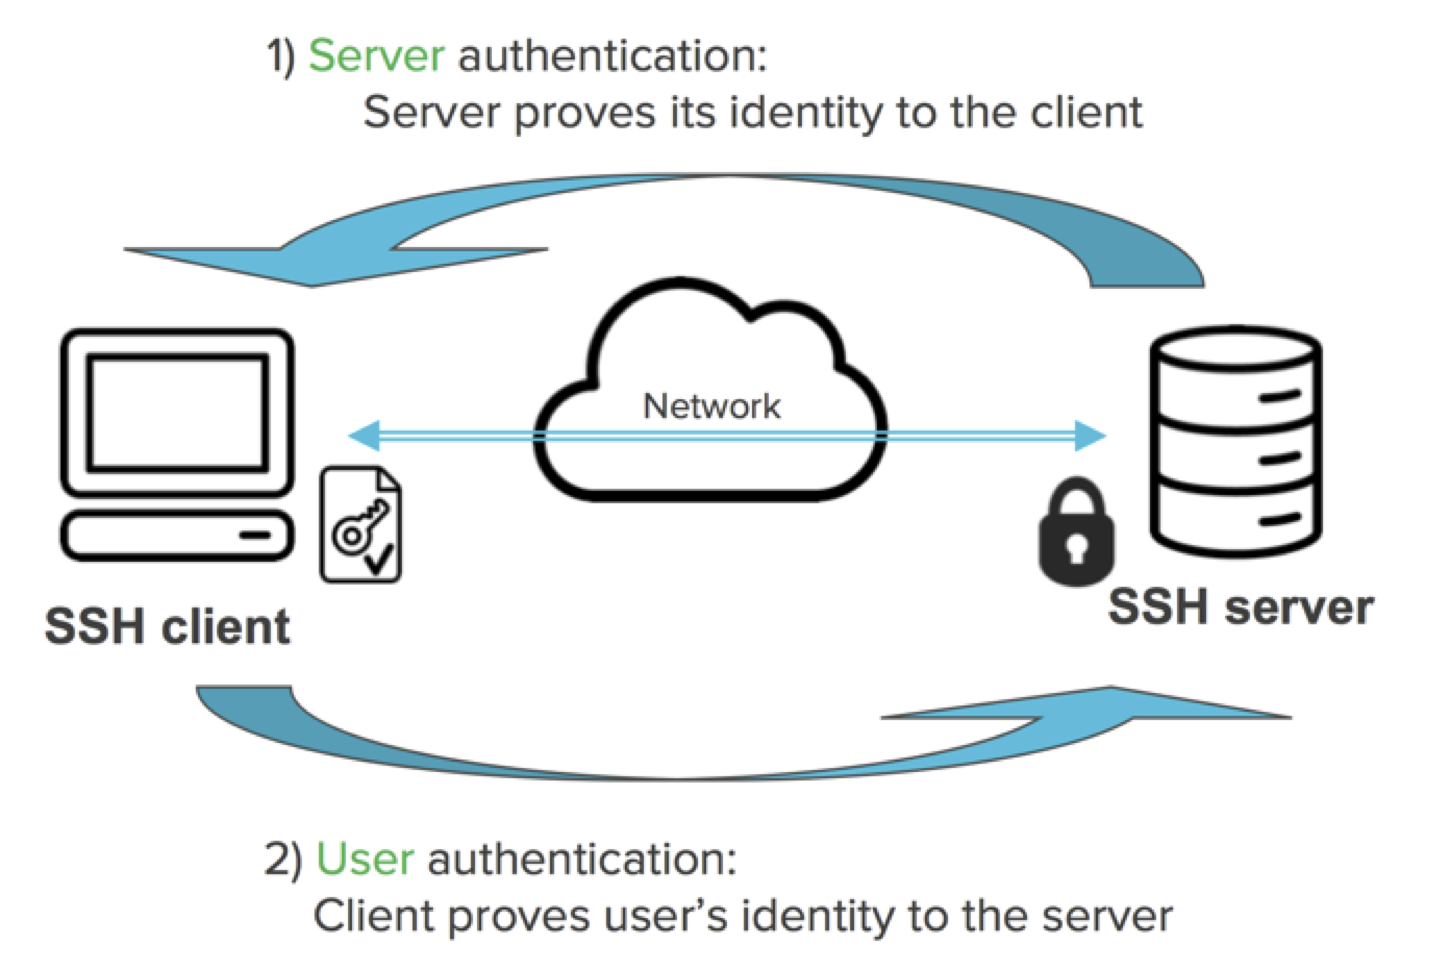
Connecting to Your IoT Device
Now that your SSH server is up and running, the next step is to establish a connection to your IoT device from your Mac. Follow this easy guide:
Step-by-Step Guide
1. Open Terminal: Open the Terminal application on your Mac.
2. Enter the SSH Command: Type the following command, replacing "username" and "IP_address" with your IoT device's credentials:
ssh username@IP_address
3. Authenticate: Input your password or use public key authentication if it has been set up.
At this point, you should have a secure connection to your IoT device, allowing you to run commands and control it remotely with ease.
Enhancing SSH Security
Security is of utmost importance when using SSH for IoT devices. Follow these best practices to strengthen the security of your SSH connections:
- Use strong passwords or implement public key authentication
- Disable root login to prevent unauthorized access attempts
- Change the default SSH port to a non-standard port for increased protection
By implementing these measures, you significantly reduce the likelihood of unauthorized access to your IoT devices, giving you peace of mind.
Public Key Authentication
Public key authentication is a highly secure way of authenticating SSH connections without needing passwords. Here's how to set it up:
1. Generate Key Pair: Use the following command to generate a key pair:
ssh-keygen
2. Copy Public Key: Transfer the public key to your IoT device using:
ssh-copy-id username@IP_address
3. Test Connection: Try to connect to your IoT device without entering a password to verify the setup.
Troubleshooting Common Issues
Even with a meticulous setup, problems can occur when using SSH. Here are some frequently encountered issues and their respective solutions:
- Connection Refused: Ensure the SSH server is active and the IP address is correct.
- Authentication Failed: Carefully check your username, password, or public key configuration.
- Timeout Errors: Check your network connection and firewall settings for potential blockages.
Consult the troubleshooting section for help if you encounter any challenges during SSH setup.
Exploring Advanced Features
Once you're comfortable with basic SSH operations, you can explore advanced features to enhance your workflow:
- SSH Tunnels: Create secure tunnels for transferring data between devices.
- SSH Config File: Streamline connection management by using an SSH config file.
- Automated Scripts: Use SSH to automate repetitive tasks on your IoT devices.
These advanced features can save valuable time and effort, boosting the efficiency of your IoT management processes.
Cost-Effective Solutions
Using SSH for IoT remote access is a cost-effective solution compared to proprietary software or hardware alternatives. With SSH, you can:
- Avoid recurring subscription fees by using open-source tools
- Minimize hardware costs by using existing devices
- Scale your IoT ecosystem effortlessly without extra expenses
By choosing SSH, you can achieve professional-grade remote access without breaking your budget.
- Polo G Net Worth How This Rapper Built His Empire
- Embrace Buenos Das Viernes Your Guide To A Happy Friday